교수님 왈 운영체제를 패스하는 사람은 많지만 그중 confident 한 사람은 얼마 없다고.
운영체제를 confident 하게 알려면 context switching을 잘 이해해야 하고
핀토스 thread_launch의 어셈블리 코드를 이해해야 한다고 한다.
휴
하나씩 짚어보자. 일단 코드는 다음과 같다.
static void
thread_launch (struct thread *th) {
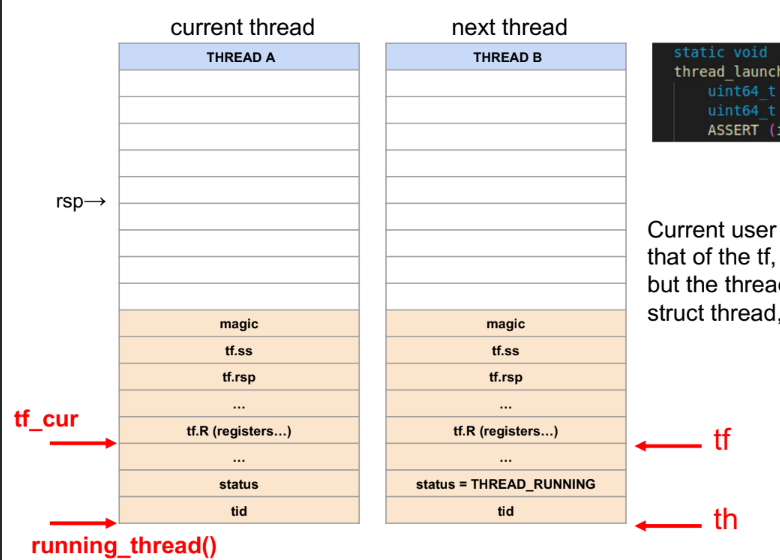
uint64_t tf_cur = (uint64_t) &running_thread ()->tf;
uint64_t tf = (uint64_t) &th->tf;
ASSERT (intr_get_level () == INTR_OFF);
/* The main switching logic.
* We first restore the whole execution context into the intr_frame
* and then switching to the next thread by calling do_iret.
* Note that, we SHOULD NOT use any stack from here
* until switching is done. */
__asm __volatile (
/* (2) Store registers that will be used. */
"push %%rax\n"
"push %%rbx\n"
"push %%rcx\n"
/* (3) Fetch input once */
"movq %0, %%rax\n"
"movq %1, %%rcx\n"
// (4)
"movq %%r15, 0(%%rax)\n"
"movq %%r14, 8(%%rax)\n"
"movq %%r13, 16(%%rax)\n"
"movq %%r12, 24(%%rax)\n"
"movq %%r11, 32(%%rax)\n"
"movq %%r10, 40(%%rax)\n"
"movq %%r9, 48(%%rax)\n"
"movq %%r8, 56(%%rax)\n"
"movq %%rsi, 64(%%rax)\n"
"movq %%rdi, 72(%%rax)\n"
"movq %%rbp, 80(%%rax)\n"
"movq %%rdx, 88(%%rax)\n"
// (5)
"pop %%rbx\n" // Saved rcx
"movq %%rbx, 96(%%rax)\n"
"pop %%rbx\n" // Saved rbx
"movq %%rbx, 104(%%rax)\n"
"pop %%rbx\n" // Saved rax
"movq %%rbx, 112(%%rax)\n"
"addq $120, %%rax\n"
// (6)
"movw %%es, (%%rax)\n"
"movw %%ds, 8(%%rax)\n"
"addq $32, %%rax\n"
// (7)
"call __next\n" // read the current rip.
"__next:\n"
"pop %%rbx\n"
"addq $(out_iret - __next), %%rbx\n"
"movq %%rbx, 0(%%rax)\n" // rip
// (8)
"movw %%cs, 8(%%rax)\n" // cs
"pushfq\n"
"popq %%rbx\n"
"mov %%rbx, 16(%%rax)\n" // eflags
"mov %%rsp, 24(%%rax)\n" // rsp
"movw %%ss, 32(%%rax)\n"
// (9)
"mov %%rcx, %%rdi\n"
"call do_iret\n"
"out_iret:\n"
: : "g"(tf_cur), "g" (tf) : "memory" // (1)
);
}
(1) 코드를 보기 전에 하나 알아야할 것이 있는데, 인라인 어셈블리는 우리가 흔히 아는 방식과 조금 다르다.
일단 레지스터 앞에 %가 두 개 붙는다는 점...(%%rax 이렇게)
How to Use Inline Assembly Language in C Code - Using the GNU Compiler Collection 13.0.0 (experimental 20221114) documentation
Previous When is a Volatile Object Accessed?
gcc.gnu.org
__asm__ (
	// assembly code 1
    // assembly code 2 ...
    // assembly code n
    : Output Operands // A comma-separated list of the C variables modified by the instructions
    : Input Operands // A comma-separated list of C expressions read by the instructions
    : Clobbers // A comma-separated list of registers or other values changed
    : Goto Labels // 몰라도 됨
)
Operands에는 쓰기/읽기 작업의 대상이 될 C 코드의 변수들이 들어간다. 포맷은 다음과 같다.
[ [asmSymbolicName] ] constraint (cexpression)
참고로 핀토스에서는 asmSymbolicName을 쓰지 않는다. 이에 대한 설명.
When not using an asmSymbolicName, use the (zero-based) position of the operand in the list of operands in the assembler template. For example if there are two output operands and three inputs, use %2 in the template to refer to the first input operand, %3 for the second, and %4 for the third.
핀토스 코드로 돌아가 어셈블리 코드의 맨 마지막 줄을 보자.
: : "g"(tf_cur), "g" (tf) : "memory"
(참고로 constraint "g"에 대한 설명은 다음과 같다: Any register, memory or immediate integer operand is allowed, except for registers that are not general registers.)
따라서 %0은 C코드의 tf_cur, %1은 C코드의 tf를 가르키는 것. 이로서 내 큰 의문 중 하나가 해결됐다...
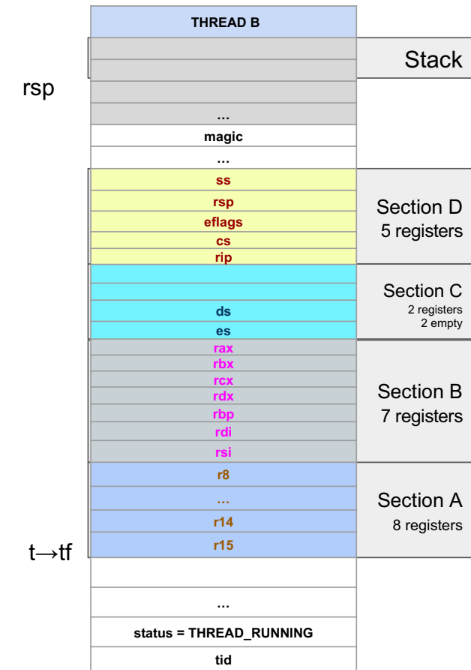
참고로 tf_cur과 tf는 각각 current thread와 next thread의 tf 시작 주소이다.
(2) 이제 본격적으로 어셈블리 코드를 파트를 나누어 살펴보자.
뒤에 나올 코드에서 rax, rbx, rcx 레지스터를 이용할 것이기 때문에 기존 값을 저장해두어야 한다.
rax, rbx, rcx의 순서로 스택에 푸시한다.
/* Store registers that will be used. */
"push %%rax\n"
"push %%rbx\n"
"push %%rcx\n"
(3) 이제 tf_cur, tf의 값을 불러오자.
%0, 즉 tf_cur; current running thread의 tf 시작 주소를 rax 레지스터로 옮긴다.
마찬가지로 %1(tf)의 값은 rcx 레지스터로 옮긴다.
/* Fetch input once */
"movq %0, %%rax\n"
"movq %1, %%rcx\n"
(4) 다음 부분은 쉽다. 현재 레지스터에 있는 값을 tf_cur에 저장하는 것.
어셈블리 주소 문법이 잘 기억 안나지만 아마 n(%%rax)는 rax값+n일 것이다
현재 r15의 값은 메모리 tf_cur에, r14는 tf_cur+8, ..., rdx 값은 tf_cur+88 주소에 저장된다.
위에 나온 tf의 구조를 보면 이해할 수 있다.
"movq %%r15, 0(%%rax)\n"
"movq %%r14, 8(%%rax)\n"
"movq %%r13, 16(%%rax)\n"
...
"movq %%rdi, 72(%%rax)\n"
"movq %%rbp, 80(%%rax)\n"
"movq %%rdx, 88(%%rax)\n"
(5) 이제 rcx, rbx, rax를 저장해야 한다.
스택에 저장해놓은 값을 가져와야 한다. rax, rbx, rcx의 순서로 푸시했기 때문에 반대 순서(c,b,a)로 팝 될 것이다.
rbx를 써서 헷갈릴 수 있는데, 얘는 그냥 도구다. 명심하자
"pop %%rbx\n"              // Saved rcx
"movq %%rbx, 96(%%rax)\n"
"pop %%rbx\n"              // Saved rbx
"movq %%rbx, 104(%%rax)\n"
"pop %%rbx\n"              // Saved rax
"movq %%rbx, 112(%%rax)\n"
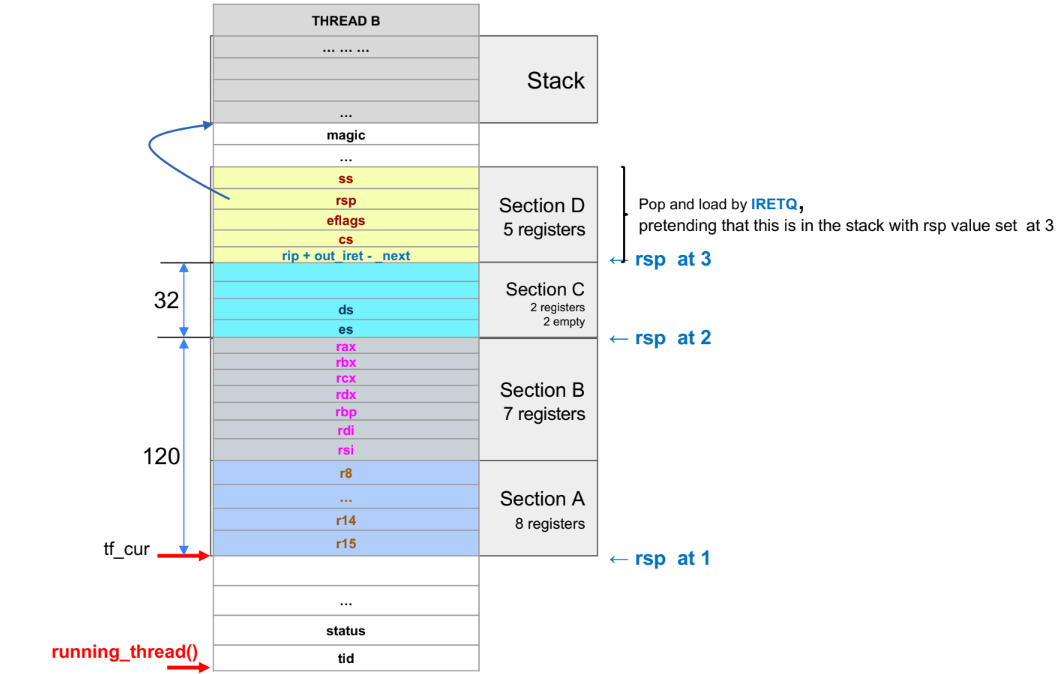
(6) 일단 다음 값은 rax + 120에 저장되겠지... 일단 rax 값을 바꿔주자. 편의를 위해서인듯? 아닐수도 있음
그리고 똑같이 남은 레지스터 값을 저장해준다.
"addq $120, %%rax\n"
"movw %%es, (%%rax)\n"
"movw %%ds, 8(%%rax)\n"
"addq $32, %%rax\n"
왜 movw인가? 무시해도 된다. movq와 똑같은 역할을 한다. 단지 byte의 차이일 뿐이다.
movq, addq, ... q 접미사는 8바이트 연산을 의미하고, w는 2바이트를 의미한다.
ds까지 저장이 끝나면 rax에 다시 32를 더해준다.
맨 위 스레드 데이터 구조 그림을 보면 section 3에 es, ds 그리고 두 개의 빈 공간이 있음을 알 수 있다.
따라서 8*4=32를 더해준다.
(7) 이제 Section D만 남았다. 우선 rip를 불러오자. rip는 직접 접근이 불가능한가보다.
슬라이드 설명을 보면 Save ip via a dummy function call. The saved value is ‘out_iret’. 라고 한다.
일단 __next라는 dummy function을 call 한다.
어셈블리어에서 call instruction은 return address, 즉 rip를 스택에 푸시한다.
푸시한 rip 값을 팝해 rbx에 저장한다.
addq 어쩌고 저쩌고는 뭘까? 아무래도 현재 rip는 context switching code를 가르키고 있는데
다음에 프로세스를 다시 시작했을 때 이 코드로 오고 싶지는 않을 테니까
out_iret으로 보내주는 것 같다. 이렇게 rip도 저장 끝
"call __next\n"         // read the current rip.
"__next:\n"
"pop %%rbx\n"
"addq $(out_iret -  __next), %%rbx\n"
"movq %%rbx, 0(%%rax)\n" // rip
(8) 남은 레지스터 값도 저장해주자. 나머지는 그냥 하면 되고, eflags도 접근이 불가능하기 때문에 다른 방법을 써야 한다.
pushfq라는 명령어는 eflags의 값을 스택에 푸시한단다. 그대로 팝해서 저장하면 끝
"movw %%cs, 8(%%rax)\n"  // cs
"pushfq\n"
"popq %%rbx\n"
"mov %%rbx, 16(%%rax)\n" // eflags
"mov %%rsp, 24(%%rax)\n" // rsp
"movw %%ss, 32(%%rax)\n"
(9) 이제 저장은 끝났다. 마지막으로 context switch를 마무리하기 위한 do_iret 함수를 불러주면 된다.
thread_launch 함수에서 지금까지 현재 레지스터 값을 tf_cur에 저장했다면,
do_iret 함수는 tf에 저장되어 있는 값을 레지스터로 불러오는 함수로, tf의 주소를 인자로 가진다.
first argument register는 무엇인가... 바로 rdi이다.
함수를 실행하기 전에 rdi에 파라미터 값을 넣어줘야 한다.
아까 전에 tf의 값을 rcx에 저장해뒀는데, 이 값을 rdi에 넣고 함수를 불러주면 끝
"mov %%rcx, %%rdi\n"
"call do_iret\n"
"out_iret:\n"
do_iret은 별거 없다
/* Use iretq to launch the thread */
void
do_iret (struct intr_frame *tf) {
	__asm __volatile(
			"movq %0, %%rsp\n"
			"movq 0(%%rsp),%%r15\n"
			"movq 8(%%rsp),%%r14\n"
			"movq 16(%%rsp),%%r13\n"
			"movq 24(%%rsp),%%r12\n"
			"movq 32(%%rsp),%%r11\n"
			"movq 40(%%rsp),%%r10\n"
			"movq 48(%%rsp),%%r9\n"
			"movq 56(%%rsp),%%r8\n"
			"movq 64(%%rsp),%%rsi\n"
			"movq 72(%%rsp),%%rdi\n"
			"movq 80(%%rsp),%%rbp\n"
			"movq 88(%%rsp),%%rdx\n"
			"movq 96(%%rsp),%%rcx\n"
			"movq 104(%%rsp),%%rbx\n"
			"movq 112(%%rsp),%%rax\n"
			"addq $120,%%rsp\n"
			"movw 8(%%rsp),%%ds\n"
			"movw (%%rsp),%%es\n"
			"addq $32, %%rsp\n"
			"iretq"
			: : "g" ((uint64_t) tf) : "memory");
}
그냥 tf에 저장되어 있는 값들을 차례대로 레지스터에 복원한다
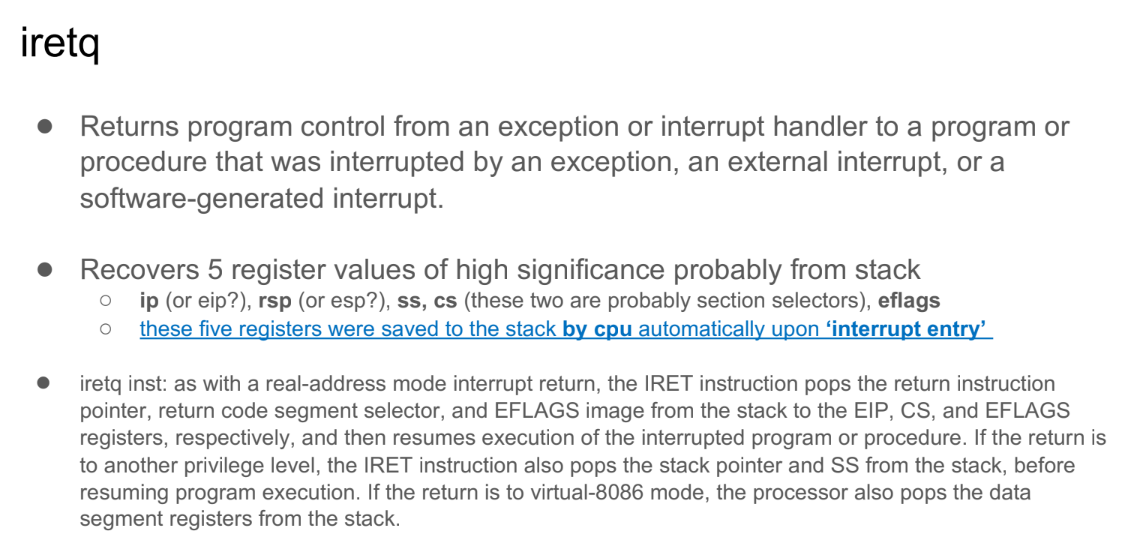
그러다가 iretq instruction을 실행하는데 이게 뭐냐면...
IRET returns from an interrupt (hardware or software) by means of popping IP (or EIP), CS, and the flags off the stack and then continuing execution from the new CS:IP. 라고 한다.
생각해보자... addq $32, %%rsp 코드로 인해 rsp는 지금 tf.rip를 가르키고 있다.(아래 그림에서 rsp at 3)
그리고 iretq에 대한 설명을 보면
Restoring of registers saved in Section D seems to be done by ‘IRETQ’.
1) It could be the case that they are recovered from the stack using the values saved by the CPU (upon
INTERRUPT_ENTRY), or
2) It is done by using Section D, pretending that it is the stack by setting rsp value to it as in the code. In case of 1), we did not even have to make Section D, nor do addq $32, %%rsp\n”
In case of 2), pintos-kaist does something differently upon INTERRUPT_ENTRY, Probably, it does not have
interrupt_frame saved in the stack. The corresponding values of registers were saved in thread_lauch().
아무튼 rsp가 section D를 가르키고 있기 때문에 스택(D)의 값들을 각 레지스터에 복구하는 것 같다
진짜 끝
'전산 > 운영체제' 카테고리의 다른 글
| Pintos Project 1: THREADS (0) | 2024.10.15 |
|---|